
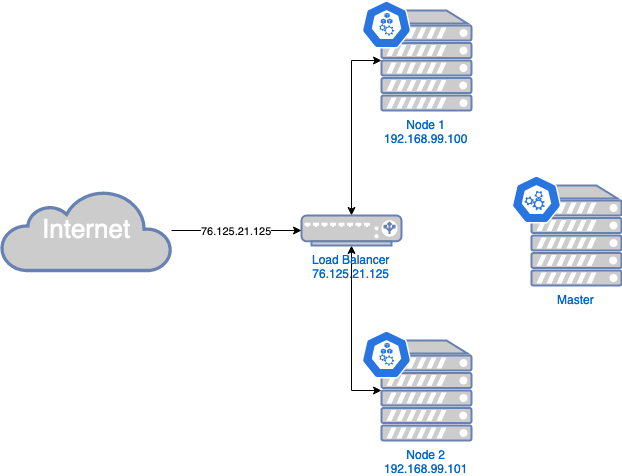
One primary goal of the server is to serve websites/apps. To access services inside a Kubernetes cluster you have to open it up somewhere. You can do this by opening a NodePort, but that will open only on the Node running the pod. When that node goes down, your application won’t be accessible under the same public ip as it was before, which might not be what you want.
LoadBalancer to the rescue. You need a LoadBalancer outside the Kubernetes Cluster, which has an IP address and routes the traffic to all nodes serving the application.
A LoadBalancer is also a requirement to deploy an Ingress Resource implementation like NGINX, which you want to use for your Web traffic.
Hetzner unfortunately doesn’t provide a LoadBalancer (yet). This is why we need to get a bit more creative using the things we have.
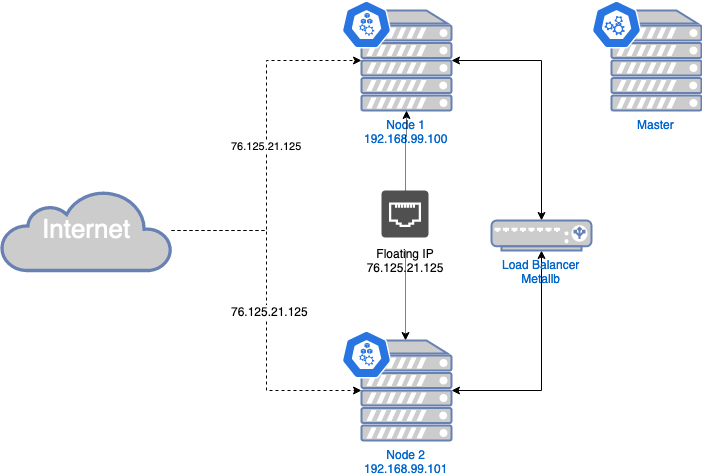
One key aspect is the floating ip, which will represent our public IP address for the LoadBalancer. But how can we setup the LoadBalancer? This is where MetalLB takes the stage. It needs just some public IPs to hand out and implements a LoadBalancer using standard routing mechanisms. But Hetzner doesn’t support handing out IPs from outside its reach, it only supports assigning it to one node (floating ip). So we will use only that one floating IP from Hetzner for €1.077/month. That floating IP can only be assigned to one node, but what happens, when that node goes down for whatever reason? Yes, all applications on that public IP won’t be available. Bummer! Thanks to C.Beneke there is hope. The hcloud fip controller checks if any node goes down and assignes that floating ip to a running node, thus saving us from down-time!
With all that in place, you’ll have a virtual LoadBalancer integrating in the Hetzner Cloud environment. It’s not an ideal solution, but the best we can get so far. Maybe Hetzner will allow us creating LoadBalancers in the future?!?
Our new solution looks like this:
Now we want to implement this and also installing the NGINX Ingress Resource Implementation in order to be able to create Ingress resources in our cluster, enabling us to easily serve websites in our cluster!
Prerequisites #
- You should have setup the Kubernetes cluster on Hetzner cloud as I described in my previous blog post.
- Create a floating ip using
or using the web-interface - floating ips - add floating ip
hcloud floating-ip create --type ipv4 --home-location nbg1 --name public-ip
Configure floating IP on every node #
In order to use the floating IP, you’ll have to configure it on each worker node separately
cat <<EOF > /etc/sysconfig/network-scripts/ifcfg-eth0:1
BOOTPROTO=static
DEVICE=eth0:1
IPADDR=<your-floating-ip-goes-here>
PREFIX=32
TYPE=Ethernet
USERCTL=no
ONBOOT=yes
EOF
then you should restart the network configuration:
systemctl restart network.serviceInstall MetalLB #
Install MetalLB by applying the Manifest
kubectl apply -f https://raw.githubusercontent.com/google/metallb/v0.8.3/manifests/metallb.yamlYou could also install it by using kustomize (Helm is unfortunately not supported anymore), please see https://metallb.universe.tf/installation/ for instructions to do so.
Now you only have to configure your floating IP in MetalLB
cat <<EOF |kubectl apply -f-
apiVersion: v1
kind: ConfigMap
metadata:
  namespace: metallb-system
  name: config
data:
  config: |
    address-pools:
    - name: default
      protocol: layer2
      addresses:
      - <your-floating-ip-goes-here>/32
EOF
Install the FIP Controller #
To implement the automatic failover mechanism, install the FIP controller.
Create a new Namespace and deploy the FIP controller into it.
kubectl create namespace fip-controller
kubectl apply -f https://raw.githubusercontent.com/cbeneke/hcloud-fip-controller/master/deploy/rbac.yaml
kubectl apply -f https://raw.githubusercontent.com/cbeneke/hcloud-fip-controller/master/deploy/deployment.yaml
Since it need to access the Hetzner Cloud API, you’ll need another API token (or you can reuse one already created before)
To create a Hetzner Cloud API token log in to the web interface, and navigate to your project -> Access -> API tokens and create a new token.
Now we can configure FIP with that Token and our floating IP
cat <<EOF | kubectl apply -f -
apiVersion: v1
kind: ConfigMap
metadata:
  name: fip-controller-config
  namespace: fip-controller
data:
  config.json: |
    {
      "hcloud_floating_ips": [ "<your-floating-ip-goes-here>" ]
    }
---
apiVersion: v1
kind: Secret
metadata:
  name: fip-controller-secrets
  namespace: fip-controller
stringData:
  HCLOUD_API_TOKEN: "<the api token you created just yet>"
EOF
Install NGINX Ingress Controller #
To serve web pages, we will deploy a NGINX Ingress Controller. Which is basically a Service Type: LoadBalancer and can route traffic to multiple endpoints/services.
You’ll deploy NGINX Ingress Controller with
kubectl apply -f https://raw.githubusercontent.com/kubernetes/ingress-nginx/master/deploy/static/mandatory.yamland since we used MetalLB we create a Service pointing to the NGINX Ingress Controller
cat <<EOF | kubectl apply -f -
kind: Service
apiVersion: v1
metadata:
  name: ingress-nginx
  namespace: ingress-nginx
  annotations:
    metallb.universe.tf/allow-shared-ip: "floating-ip"
  labels:
    app.kubernetes.io/name: ingress-nginx
    app.kubernetes.io/part-of: ingress-nginx
spec:
  type: LoadBalancer
  selector:
    app.kubernetes.io/name: ingress-nginx
    app.kubernetes.io/part-of: ingress-nginx
  ports:
    - name: http
      port: 80
      targetPort: http
    - name: https
      port: 443
      targetPort: https
EOF
Now we can deploy Ingress resources and pointing our browser to http://<floating-ip-address>/<whatever>, we will see that
deployed page/application.
But we don’t like entering IP addresses to browsers, which is why there is DNS. Since we don’t want to do that manually I have something in mind, which I’ll write about soon!